How I Built a Lofi Music Player with AI-Generated Tracks
Try out the web player here!
I recommend using the Chrome desktop browser for the best experience. You can also check out the Medium published version here. 
Lofi Station Demo
The idea to create my own lofi web player occurred to me on one Sunday afternoon when I was learning about deep generative models. I did some research and finished the project during the holiday times. The web player provides two options: users can either choose a lofi track based on a real song encoded with Tone.js, or they could choose an AI-generated solo track. Both options will be layered on top of the drum loop, ambience sounds, and quotes that users selected in the previous step. This post will mainly talk about how to use LSTM models to generate a midi track, and I will briefly discuss how to make a song with Tone.js at the end.
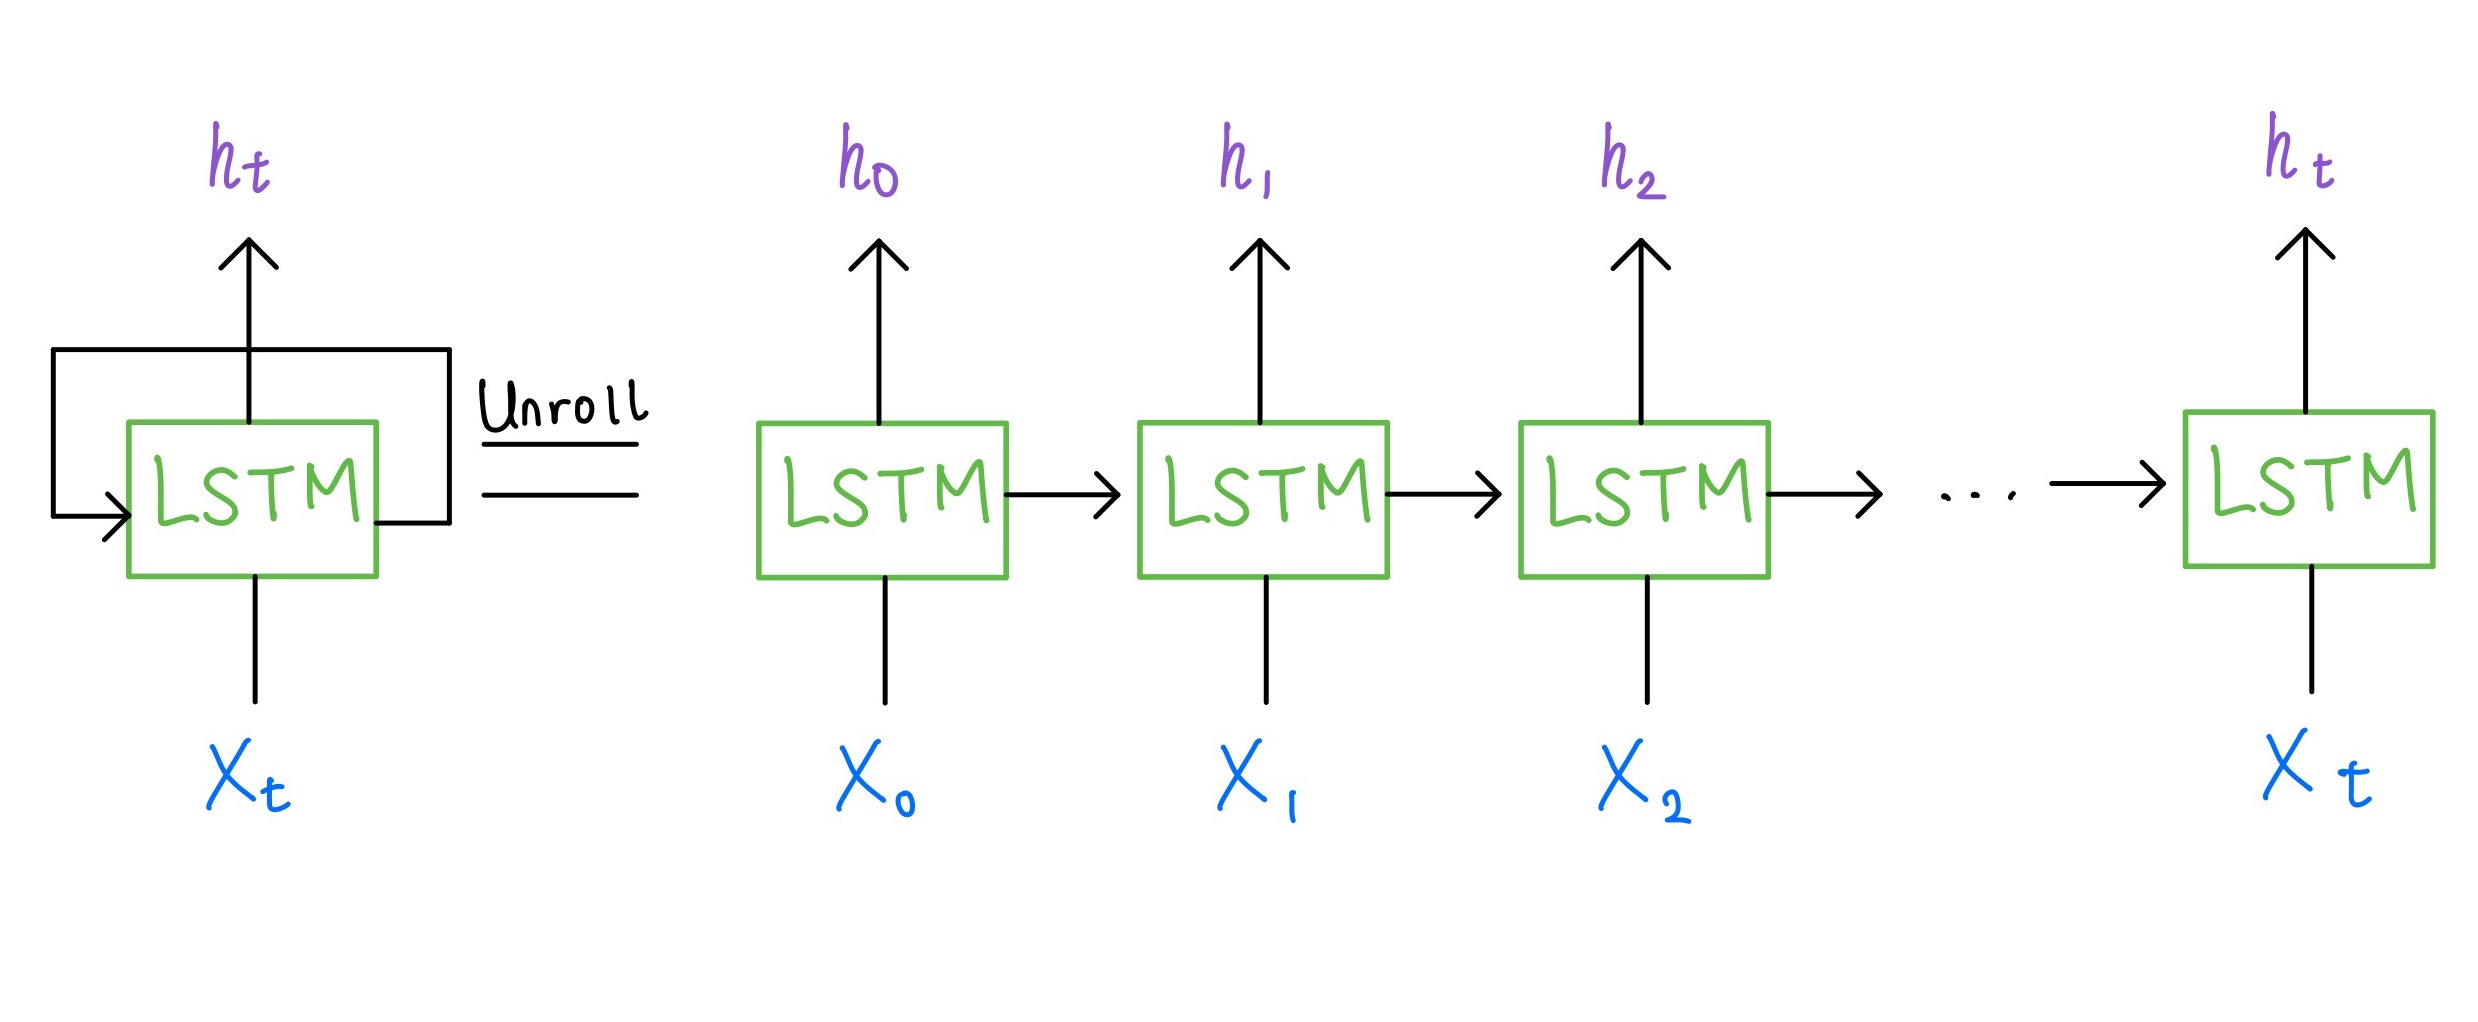
Unrolled LSTM Model Architecture
Each cell contains four main components that allow them to handle long term dependencies better: forget gate: determines what information to forget input gate: determines what information to update and store in our cell state cell state update: make element-wise operations to update the cell state output gate: determines what information to output 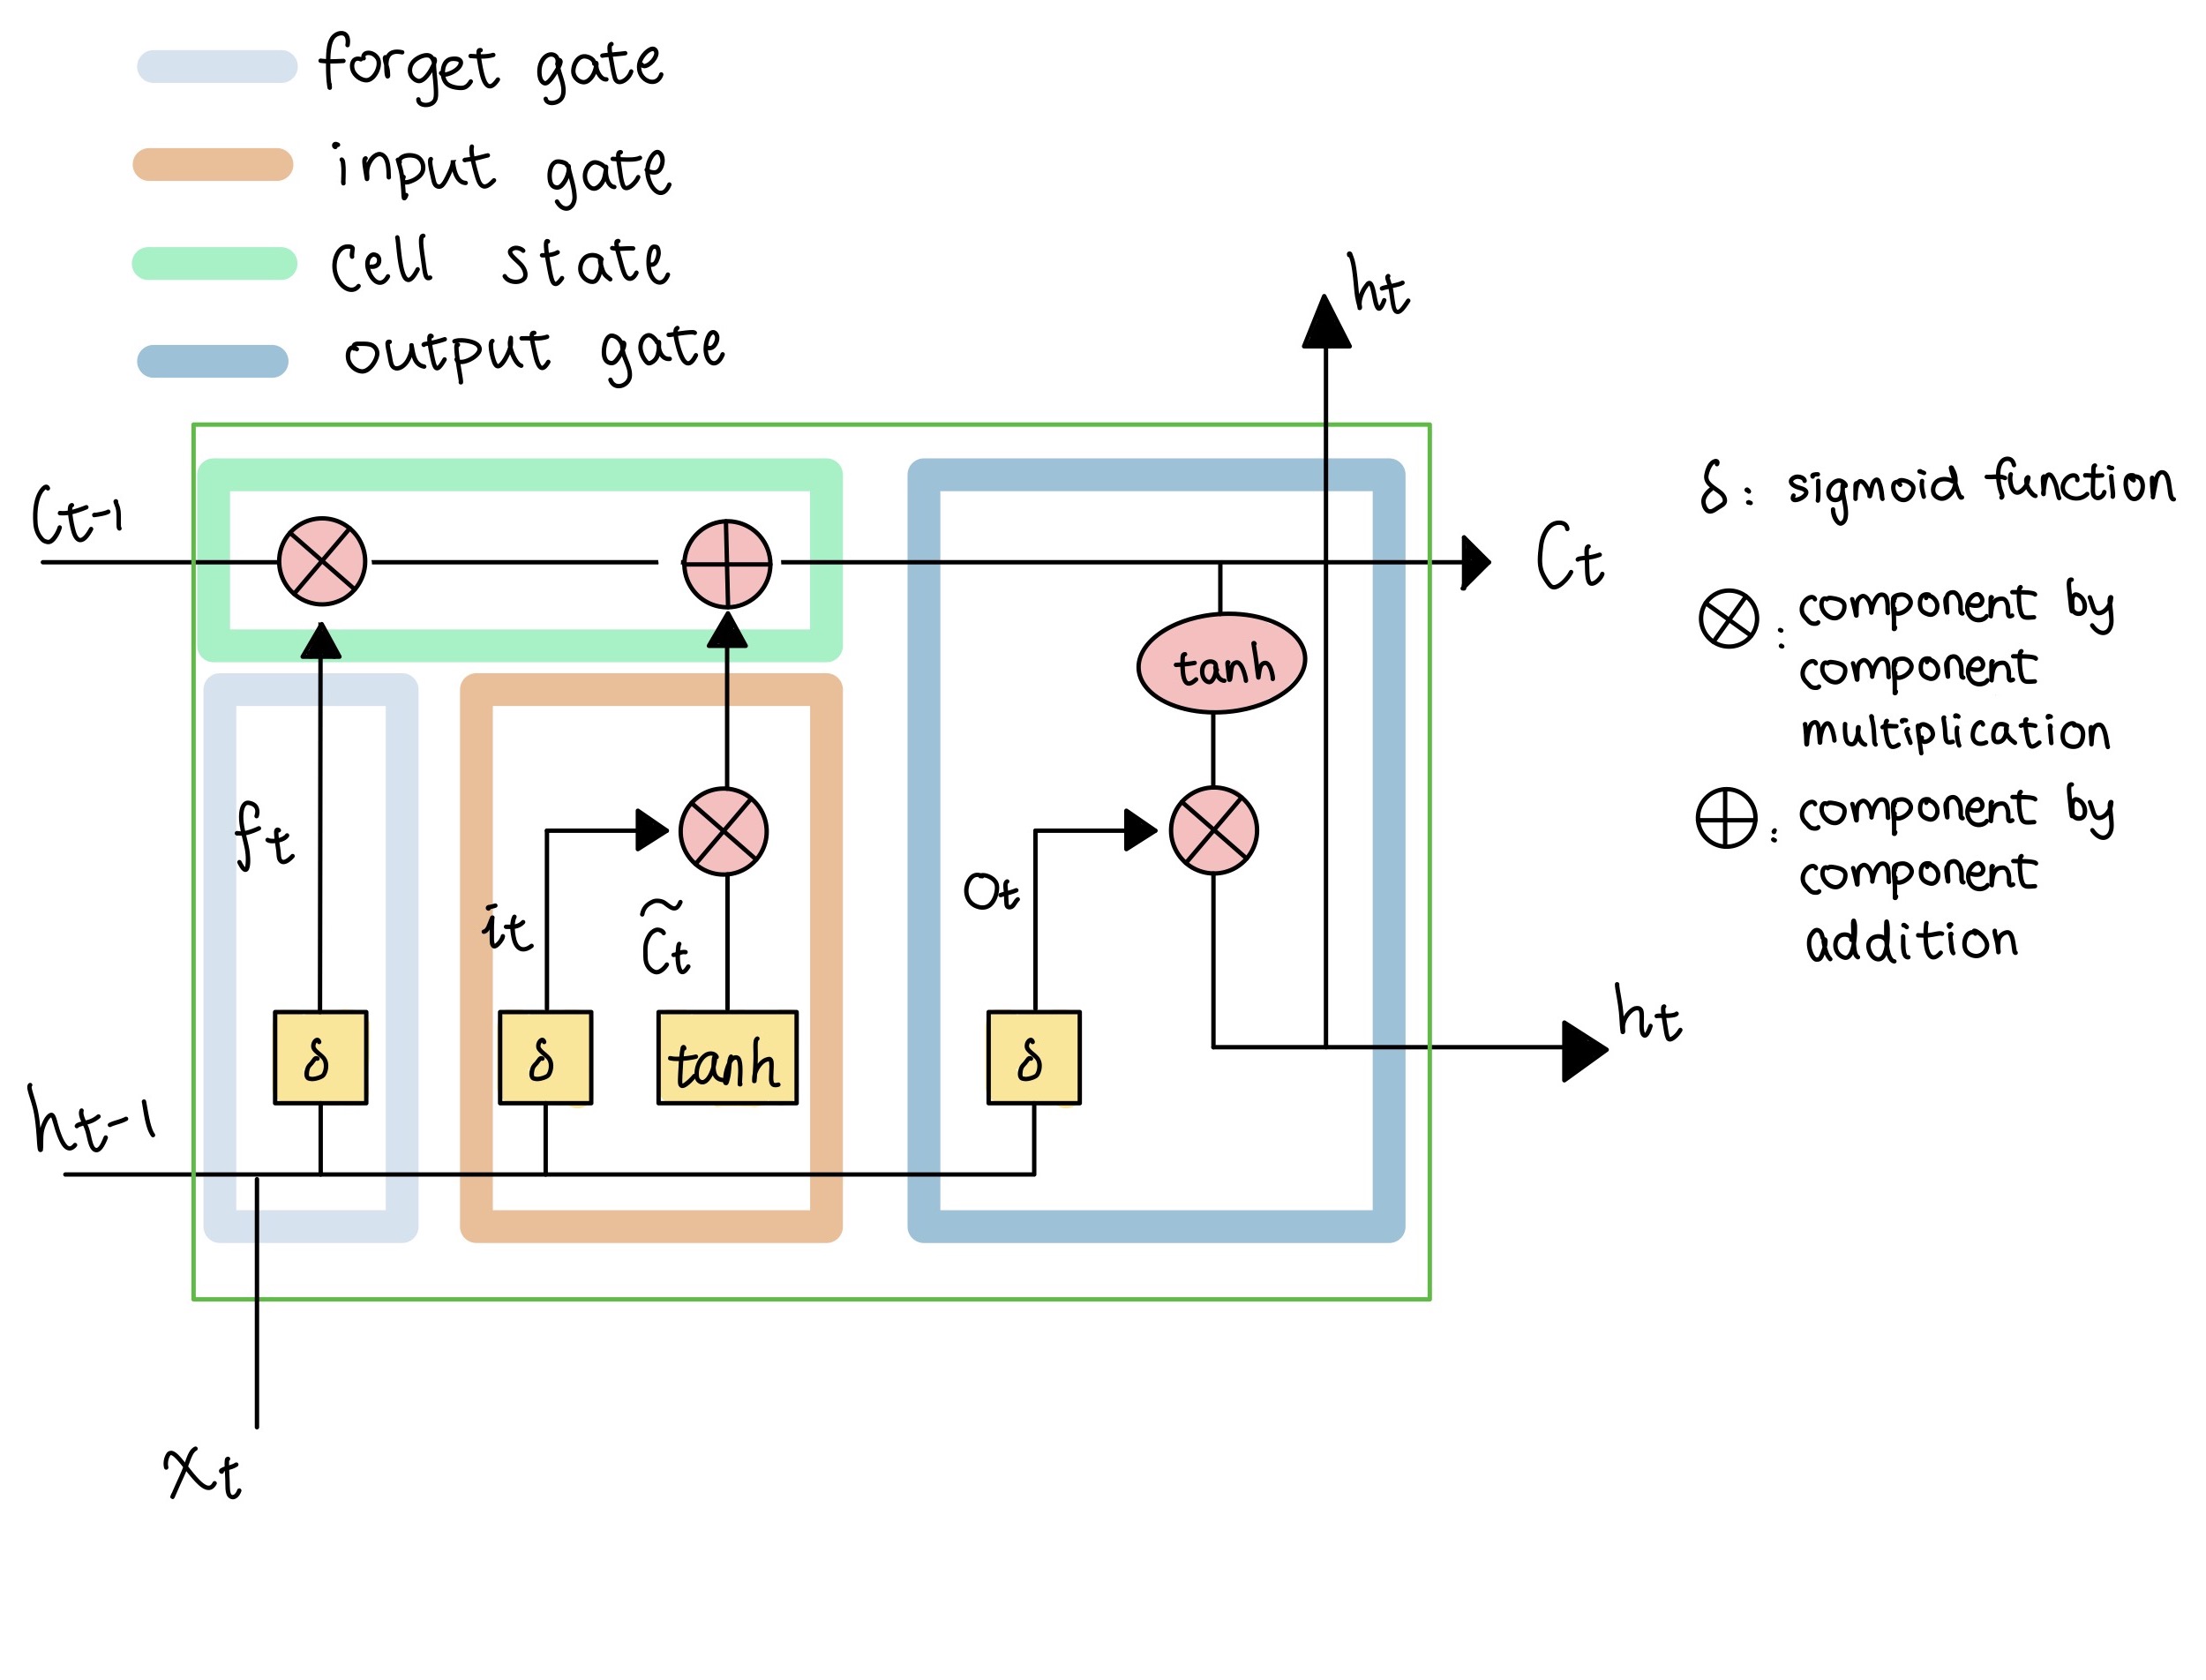
Inside an LSTM cell
For this project, I used some lo-fi midi samples from YouTube creator Michael Kim-Sheng, who have generously given me permission to use his files. I also leveraged some midi files in this Cymatics lo-fi toolkit licensed for commercial use. In order to make sure that I am training my model on quality data (plausible chord progression and meter for lofi hip hop), I listened to a subset of tracks from each source and filtered out my training dataset. The model architecture is inspired by the classical piano composer repository here.
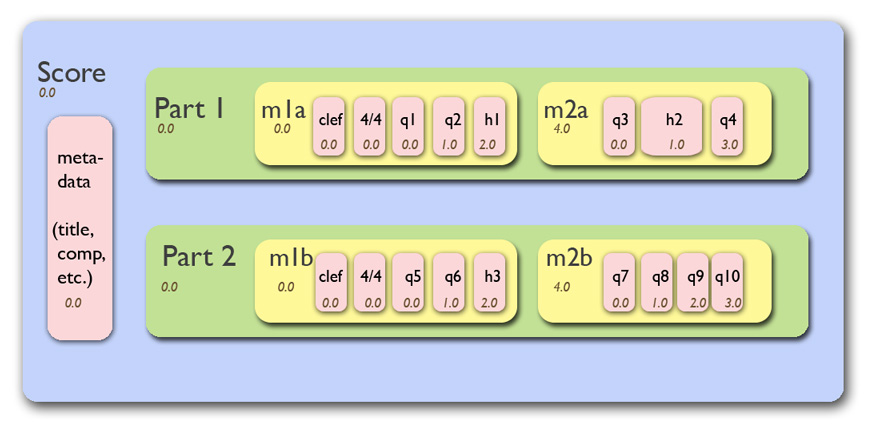
Music21 hierarchy As mentioned previously, music21 stores each note, rest, and chord as a Python object, so the next step is to encode them and map them to integers that the model can train on. The model output should contain not just notes, but also chords and rests, so we will encode each type separately and map the encoded value to an integer. We do this for all the midi files and concatenate them into one sequence to train the model on. Chords: get the pitch names of the notes in a chord, convert them to their normal order and connect them with a dot in the string format, "#.#.#" Notes: use the pitch name as the encoding Rests: encoded as the string "r" 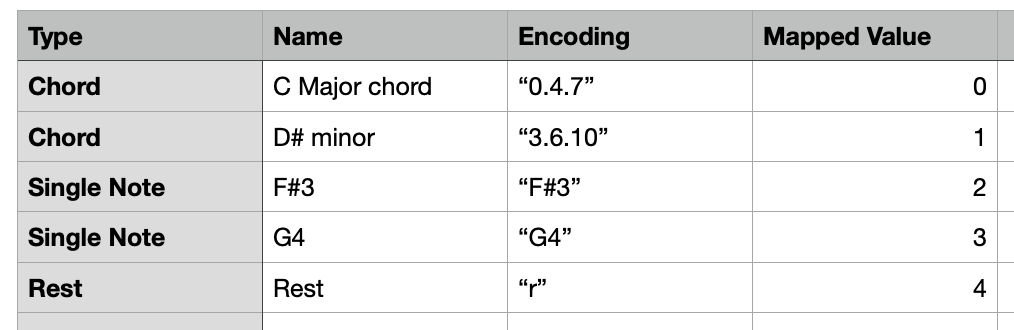
Midi Encoding and Mapping
Dropout layers: to regularize the network and prevent overfitting by randomly setting input units to 0 with a frequency of rate at each step during training time (in our case, the rate is 0.3) Dense layers: fully connects the preceding layer and performs matrix-vector multiplication in each node. The last dense layer needs to have the same amount of nodes as the total number of unique notes/chords/rest in our network. Activation layers: adds non-linearity to our network if used in a hidden layer and helps the network classify to a class if used in an output layer.
The data generated from the last paragraph is still an integer, so we decode it back to a note/chord/rest using the same mappings during encoding. If it is a chord string format, we will read the integer notation from the string "#.#.#.#" and create a music21.chord object. If it is a note or rest, we will create a corresponding note and rest object accordingly. At the same time, we append the new data point generated to the prediction output sequence at each timestep. For an illustration of this process, please see the example flow below where we are generating a sequence of 4 data points with an input sequence of 3 data points. 
Output Generation and Midi Decoding Now we have a sequence of notes, chords, and rests. We could put them in a music21 stream and write out the midi file, in which case all the notes will be quarter notes. To keep the output a little bit more interesting, I added a code snippet that randomly samples a duration to specify for each note or chord (The default probability distribution is 0.65 for eighth notes, 0.25 for 16th notes, 0.05 for both quarter and half notes). Rests are defaulted to 16th rests so that we don't have too long of a silence between notes.
Drum patterns are looped every 8 measures, ambience sounds every 12 measures, and AI solo tracks every 30 measures. Quotes are not looped and start at the beginning of the 5th measure.
Then we can write in the melody and chord progression by specifying the notes and the time that the note should take place. I recommend using TransportTime to encode the beat exactly as we want. TransportTime is in the form of "BARS:QUARTERS:SIXTEENTHS" and uses zero-based numbering. For example, "0:0:2" means the note will take place after two sixteenth notes passed in the first bar. "2:1:0" means the note will take place in the third bar, after one quarter note passed. I wrote in the melody and chord progressions for 3 existing songs: Ylang Ylang by FKJ, La Festin by Camille, and See You Again by Tyler, the Creator this way.
Add start of sequence and end of sequence tokens so that the model can learn the music pattern as the song comes to an end. Incorporate encoding for note duration so that beat tracking can be enabled.
It would be cool to connect the backend AI model to the web player so that the output can be generated live. Currently the roadblock is that the model takes a few minutes to generate the output, but likely we could leverage a pre-trained model API. User interactivity could be greatly improved if the web player allows the users to 1) put in chord progression of their own choice 2) write down some text that the web player will do sentiment analysis on and output a chord progression matching the sentiment.
I recommend using the Chrome desktop browser for the best experience. You can also check out the Medium published version here.
Lofi Station Demo
Introduction
Lofi hip hop music has been my go-to study buddy ever since college. It creates a cozy and calming vibe with a relatively simple musical structure. Some jazzy chord progressions, groovy drum patterns, ambience sounds, and nostalgic movie quotes can give us a pretty decent sounding lofi hip hop track. On top of the musical side, animated visuals are also a crucial part of the lofi aesthetics, setting the ambience along with the nature sounds of water, wind, and fire.The idea to create my own lofi web player occurred to me on one Sunday afternoon when I was learning about deep generative models. I did some research and finished the project during the holiday times. The web player provides two options: users can either choose a lofi track based on a real song encoded with Tone.js, or they could choose an AI-generated solo track. Both options will be layered on top of the drum loop, ambience sounds, and quotes that users selected in the previous step. This post will mainly talk about how to use LSTM models to generate a midi track, and I will briefly discuss how to make a song with Tone.js at the end.
LSTM Model Architecture & Midi Generation
In a previous post, I explained what an LSTM network is. For a quick refresher, it is a special type of RNN that handles long term dependencies better. It also has a recurrent structure that takes the output from the previous timestep at the current timestep. To better understand it, we can unroll the network and think of an LSTM cell as multiple copies of the same network, each passing a message to the next timestep, as shown below.Unrolled LSTM Model Architecture
Each cell contains four main components that allow them to handle long term dependencies better:
Inside an LSTM cell
Training Data Preparation
We have a couple of options when it comes to the music data format we are training the model on: raw audio, audio features (e.g. time frequency representations like Mel spectrogram), or symbolic music representation (e.g. midi files). Our goal is to generate a solo track (i.e. a sequence of notes, chords, and rests) to layer on other components like drum loops, so midi files are the easiest and most effective format to achieve our goal. Raw audio is very computationally expensive to train on. To put it in perspective, music clips sampled at 48000kHz mean there are 48000 data points in one second of audio. Even if we downsample it to 8kHz, that is still 8000 data points for every second. In addition, clean audio of only the melody or chord progression is extremely rare. However, we could still find some midi files containing only the chord progression / melody if we try hard enough.For this project, I used some lo-fi midi samples from YouTube creator Michael Kim-Sheng, who have generously given me permission to use his files. I also leveraged some midi files in this Cymatics lo-fi toolkit licensed for commercial use. In order to make sure that I am training my model on quality data (plausible chord progression and meter for lofi hip hop), I listened to a subset of tracks from each source and filtered out my training dataset. The model architecture is inspired by the classical piano composer repository here.
Load and encode the midi files
A Python package music21 can be used to load the midi files. Music21 parses a midi file and stores each musical component into a specific Python object. In other words, a note will be saved as a Note object, a chord will be saved as a Chord object, and a rest will be saved as a Rest object. Their name, duration, pitch class and other attributes can be accessed through the dot notation. Music21 stores the music clip in a hierarchy shown below, and we can extract the necessary information accordingly. If you are interested in how to use the package, the package website has a beginner-friendly user guide and Valerio Velardo from The Sound of AI has a tutorial on how to use music21 as well.Music21 hierarchy
Midi Encoding and Mapping
Create the Input and Target Pairs
Now we have a model-friendly encoding of our midi data. The next step would be to prepare the input and target pairs to feed into the model. In a simple supervised classification machine learning problem, there are input and target pairs. For example, a model that classifies a dog breed will have the fur color, height, weight, and eye color of the dog as input and the label / target will be the specific dog breed the dog belongs to. In our case, the input will be a sequence of length k starting from timestep i, and the corresponding target will be the data point at timestep i+k. So we will loop through our encoded note sequence and create the input and target pairs for the model. As a last step, we change the dimension of the input to the keras-friendly format and one-hot encode the output.Model Structure
As previously mentioned, we will use LSTM layers as our core structure. In addition, this network also uses the below components:
model = Sequential()
model.add(LSTM(
    256,
    input_shape=(network_input.shape[1], network_input.shape[2]),
    return_sequences=True
))
model.add(Dropout(0.3))
model.add(LSTM(512, return_sequences=True))
model.add(Dropout(0.3))
model.add(LSTM(256))
model.add(Dense(256))
model.add(Dropout(0.3))
model.add(Dense(n_vocab))
model.add(Activation('softmax'))
model.compile(loss='categorical_crossentropy', optimizer='rmsprop')
model.fit(network_input, network_output, epochs=200, batch_size=128)
Output Generation & Decoding Back to Midi Notes
The output generation process is similar to the training process – we give the model a sequence of length m (we'll also call it sequence m for notation simplification) and ask it to predict the next data point. This sequence m has a start index randomly selected from the input sequence, but we can also specify a specific start index if we wish. The model output is a list of probabilities from softmax that tell us how much each class is suited as the next data point. We will pick the class with the highest probability. In order to generate a sequence of length j, we will repeat this process by removing the first element of the sequence m and adding the recently generated data point to this sequence m, until the model generates j new data points.The data generated from the last paragraph is still an integer, so we decode it back to a note/chord/rest using the same mappings during encoding. If it is a chord string format, we will read the integer notation from the string "#.#.#.#" and create a music21.chord object. If it is a note or rest, we will create a corresponding note and rest object accordingly. At the same time, we append the new data point generated to the prediction output sequence at each timestep. For an illustration of this process, please see the example flow below where we are generating a sequence of 4 data points with an input sequence of 3 data points.
Output Generation and Midi Decoding
NOTE_TYPE = {
            "eighth": 0.5,
            "quarter": 1,
            "half": 2,
            "16th": 0.25
        }
offset = 0
output_notes = []

for pattern in prediction_output:
    curr_type = numpy.random.choice(list(NOTE_TYPE.keys()), p=[0.65,0.05,0.05, 0.25])

    # pattern is a chord
    if ('.' in pattern) or pattern.isdigit():
        notes_in_chord = pattern.split('.')
        notes = []
        for current_note in notes_in_chord:
            new_note = note.Note(int(current_note))
            new_note.storedInstrument = instrument.Piano()
            notes.append(new_note)
        new_chord = chord.Chord(notes, type=curr_type)
        new_chord.offset = offset
        output_notes.append(new_chord)
    elif str(pattern).upper() == "R":
        curr_type = '16th'
        new_rest = note.Rest(type=curr_type)
        new_rest.offset = offset
        output_notes.append(new_rest)
    # pattern is a note
    else:
        new_note = note.Note(pattern, type=curr_type)
        new_note.offset = offset
        new_note.storedInstrument = instrument.Piano()
        output_notes.append(new_note)

    # increase offset each iteration so that notes do not stack
    offset += NOTE_TYPE[curr_type]

midi_stream = stream.Stream(output_notes)

midi_stream.write('midi', fp='test_output.mid')
Building the web player with Tone.js
Tone.js is a web audio framework for creating interactive music in the browser. You can use it to build a lot of fun interactive websites (see demos here). But in our case, it provides a global transport to make sure our drum patterns, ambience sounds, quotes, and melody play at the same time. It also allows us to write in music score, sample an instrument, add sound effects (reverberation, gain, etc.), and create loops right in JavaScript. Credit goes to Kathryn for the code skeleton. If you want a quick and effective crash course on Tone.js, I highly recommend the use case examples on their website. The most important takeaway is that for each sound event we create, we need to connect them to the AudioDestinationNode (aka our speakers) throughtoDestination() or through samplePlayer.chain(effect1, Tone.Destination) if we want to add sound effects to it. Then through Tone.Transport, we will be able to start, pause, and schedule events on the master output. Looping the Audio Clips
Drum patterns, ambience sounds, quotes, and the pre-generated AI tracks are all audio files (.mp3 or .wav) loaded into our web player through a Player class. After loading the user input events from the website, they are then fed into a Tone.js Part class to create loops.Drum patterns are looped every 8 measures, ambience sounds every 12 measures, and AI solo tracks every 30 measures. Quotes are not looped and start at the beginning of the 5th measure.
Creating Melody and Chord Progression with Instrument Samples
Tone.js does not provide software instrument options that we see in DAW, only samplers that allow us to sample our own instruments by loading in a couple of notes. The sampler will then repitch the samples automatically to create the pitches which were not explicitly included.Then we can write in the melody and chord progression by specifying the notes and the time that the note should take place. I recommend using TransportTime to encode the beat exactly as we want. TransportTime is in the form of "BARS:QUARTERS:SIXTEENTHS" and uses zero-based numbering. For example, "0:0:2" means the note will take place after two sixteenth notes passed in the first bar. "2:1:0" means the note will take place in the third bar, after one quarter note passed. I wrote in the melody and chord progressions for 3 existing songs: Ylang Ylang by FKJ, La Festin by Camille, and See You Again by Tyler, the Creator this way.